
NewAutoCAD plugin · version 3.2
RoadPro: a complete road in AutoCAD from one command
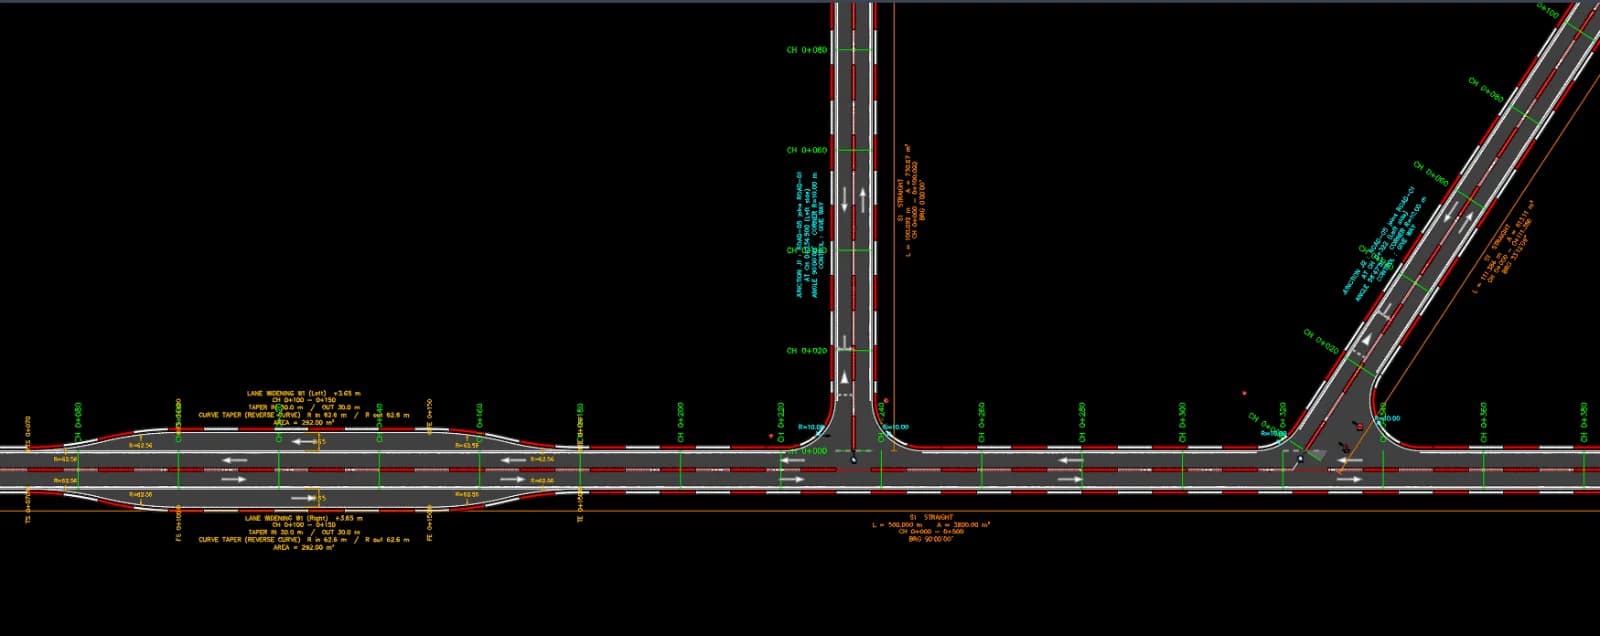
Type RDP, draw the centre line, and RoadPro draws the edges, turning radius, barricades, signs, chainage, cross section and a report with an Excel file. Free, for AutoCAD, Civil 3D and Map 3D.
RoadPro.lsp and install notes in a zip, 55 KB · Full AutoCAD 2013 or newer (not LT) · Free account needed
New in RoadPro 3.2
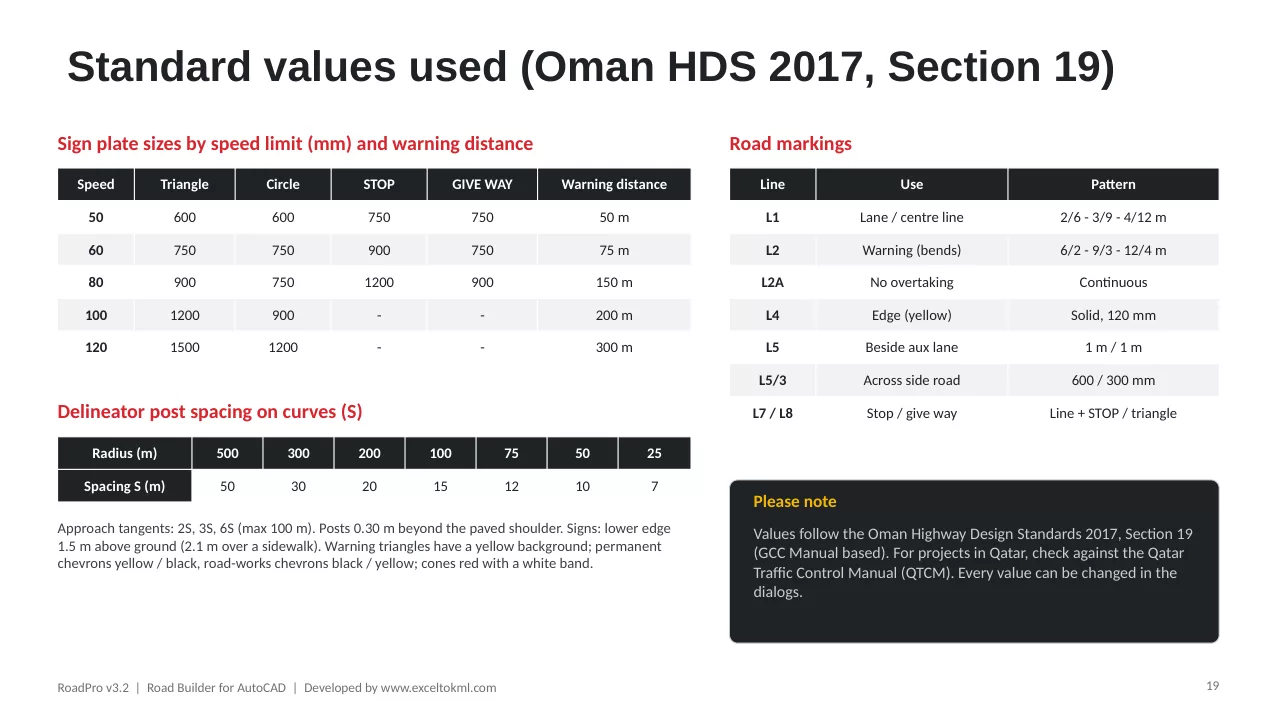
Signs and markings to standard
Sign plate sizes and warning distances by speed limit, L1 / L2 / L2A centre lines, yellow L4 edge lines, stop and give-way lines, and delineator posts on curves.
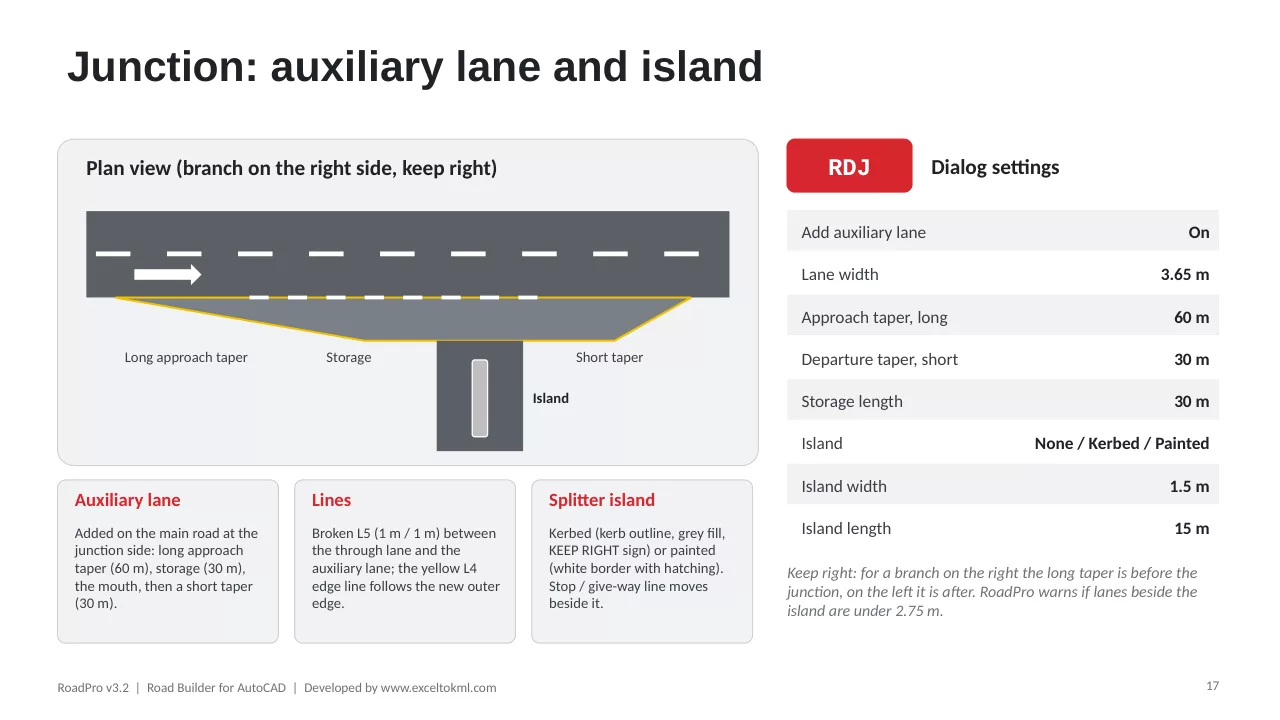
Auxiliary lane and island
RDJ can add a turning lane with a long approach taper, storage and a short taper, plus a kerbed or painted splitter island.
Cones, kerb and shoulder
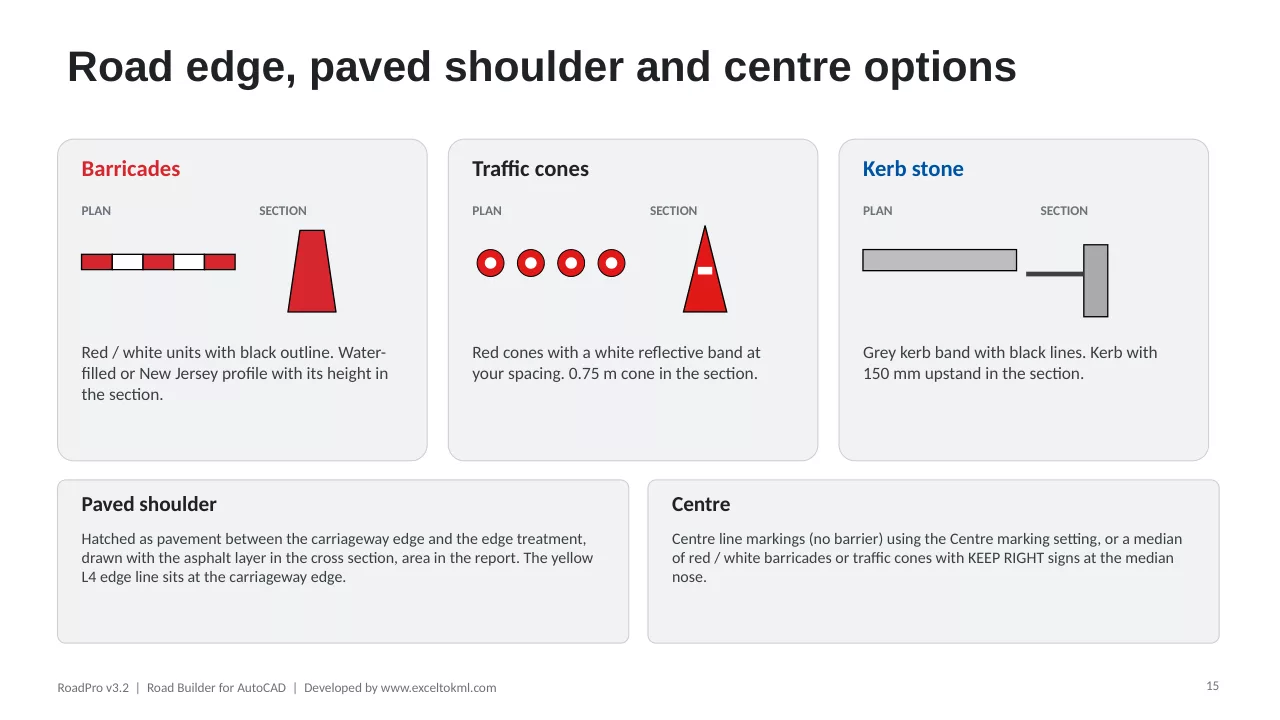
Edge with barricades, traffic cones or kerb stone, add a paved shoulder, and use barricades or cones as a median. Shown in plan and section.
Match the existing radius
Turning radius can match the existing road or be typed in, and the road-works sign set uses black / yellow chevrons.
Standards: Sign sizes, warning distances and road markings follow the Oman Highway Design Standards 2017, Section 19 (GCC Manual based). For projects in Qatar, check them against the Qatar Traffic Control Manual (QTCM). Every value can be changed in the dialogs.
Demo
Watch RoadPro build a road
Three minutes in AutoCAD Civil 3D: the dialog, the centre line, the finished road, the report and the Excel file, the sign legend and the cross section.
No sound. Tip: switch to full screen to read the drawing.
User guide
Look inside the user guide
22 illustrated pages: every command, setting, layer and sign. Here are 8 of them; tap a page to open it in the guide.
Page 1
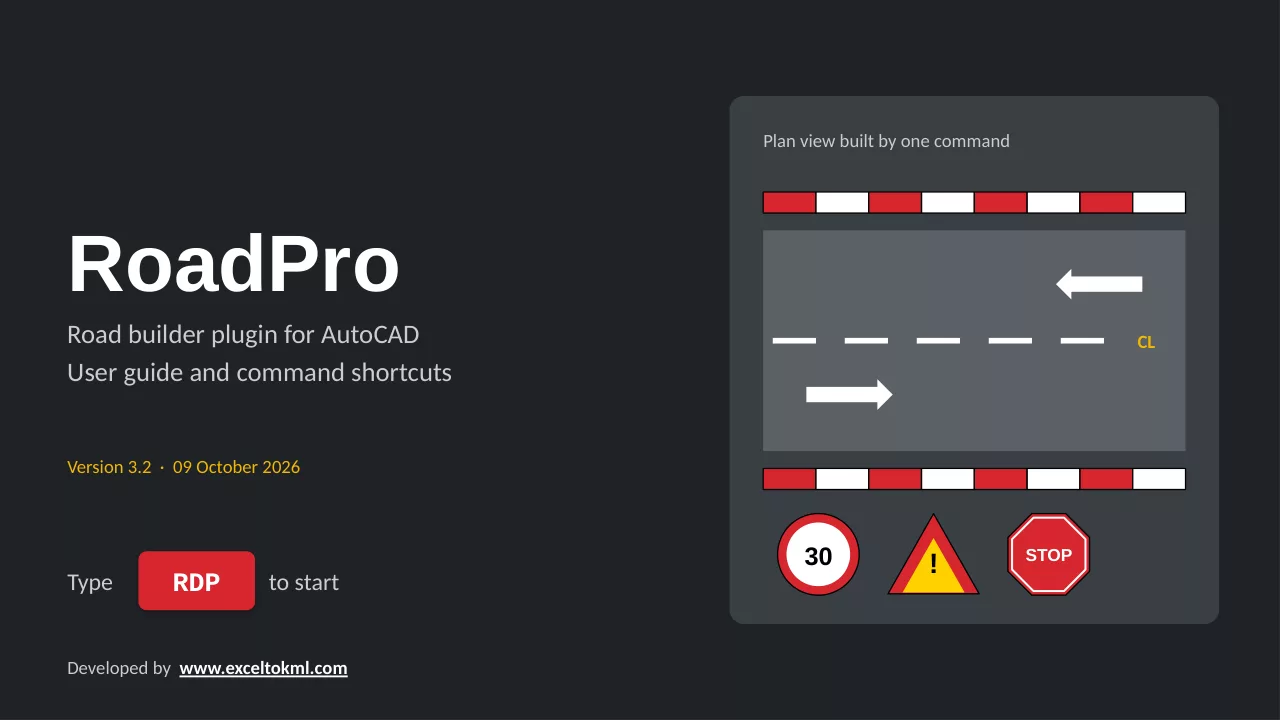
RoadPro at a glance
Type RDP to start: the plan view built by one command.
Page 2
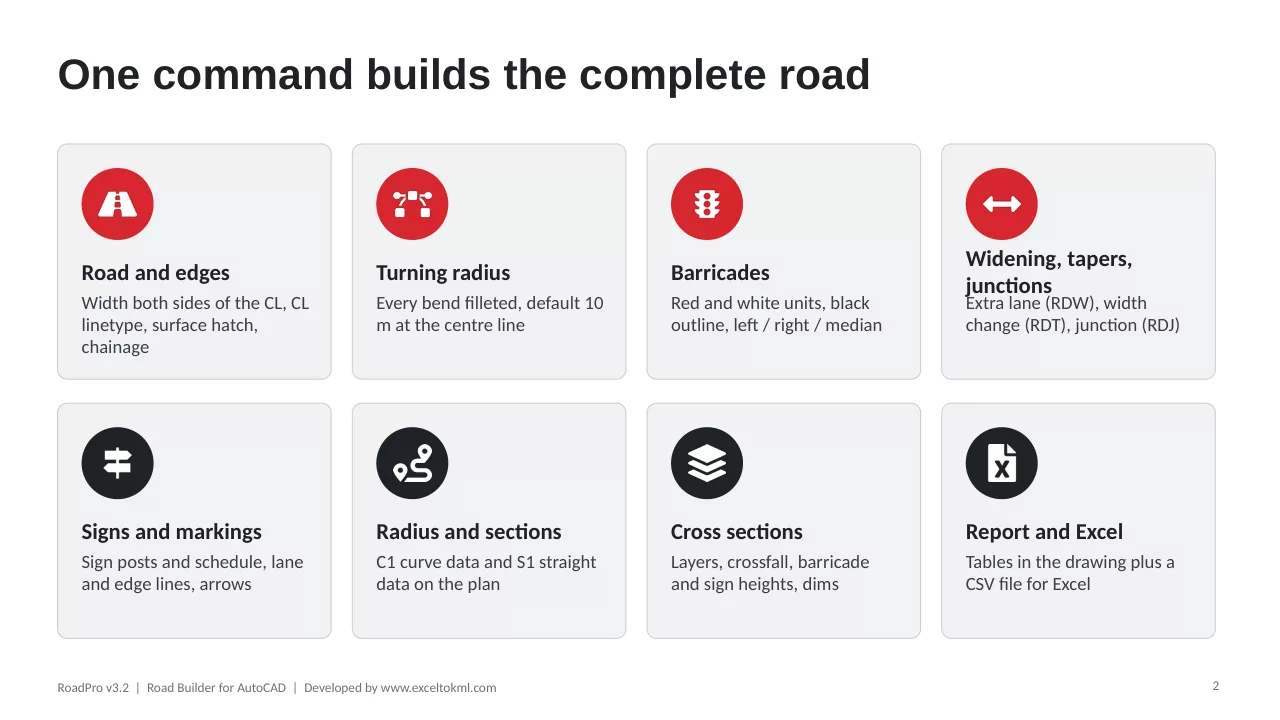
One command builds the road
Edges, radius, barricades, widening, junctions, signs and markings.
Page 15
Edge, shoulder and centre
Barricades, traffic cones or kerb stone, a paved shoulder and the median.
Page 16
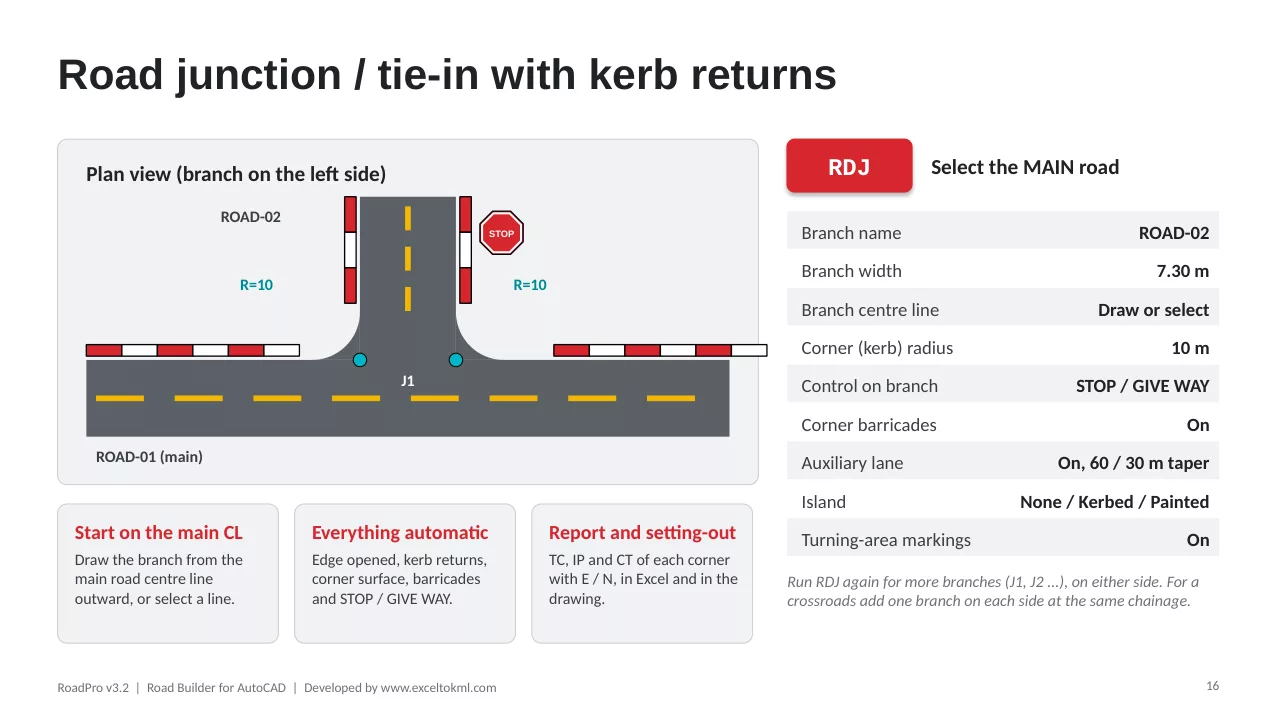
Junctions and tie-ins
Join a branch road with kerb returns and STOP / GIVE WAY.
Page 17
Auxiliary lane and island
New: a turning lane with tapers and storage, and a splitter island.
Page 18
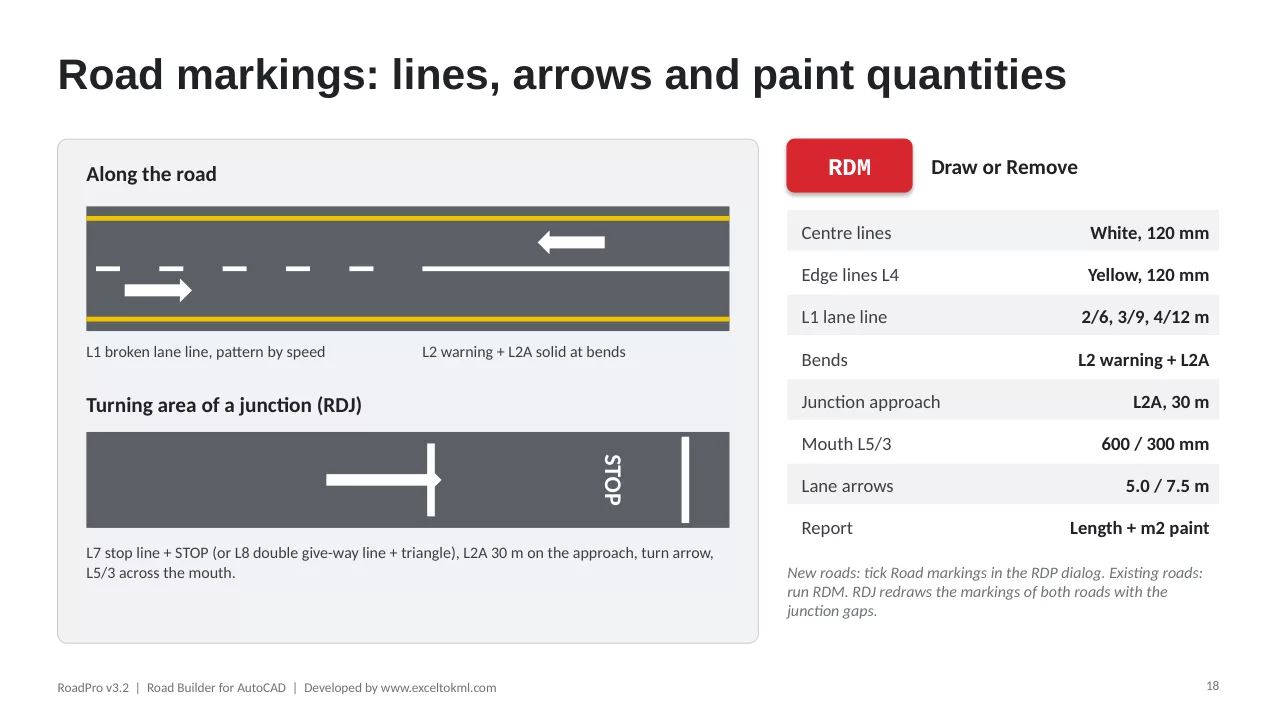
Road markings
Centre, edge and lane lines, junction markings and paint quantities.
Page 19
Standard values
New: sign sizes, warning distances, line patterns and delineator spacing.
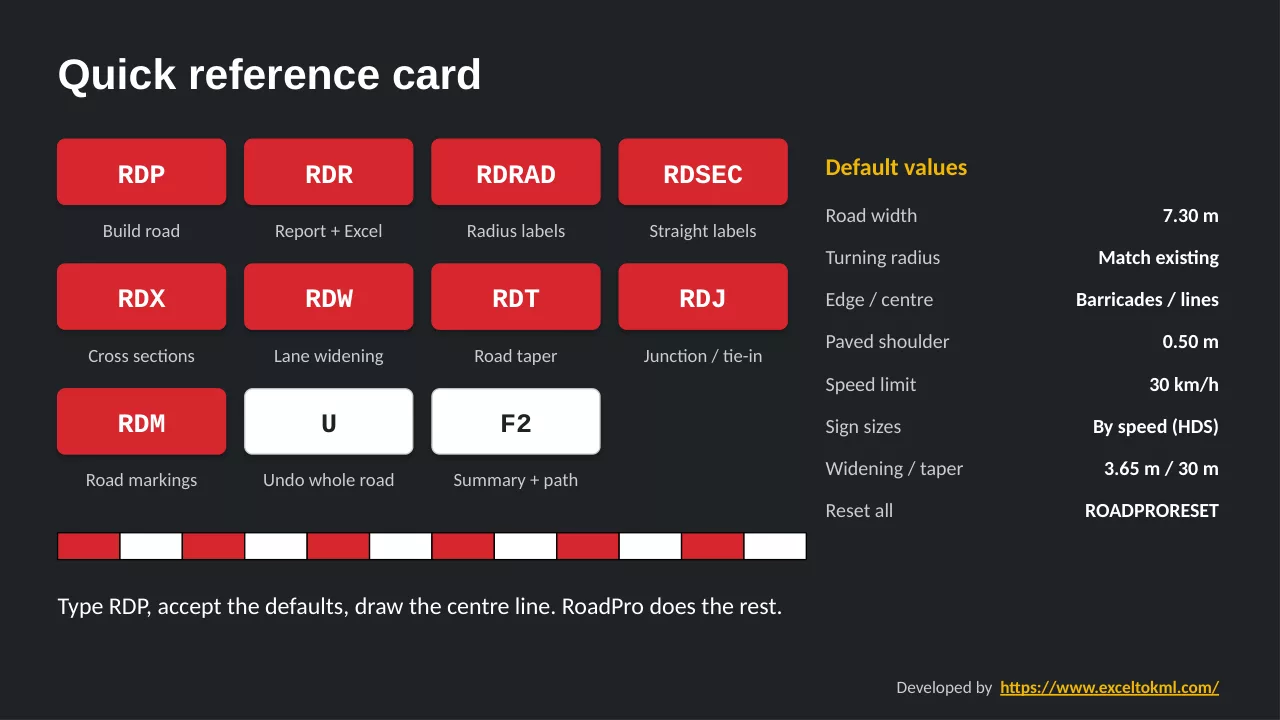
Page 22
Quick reference card
Every shortcut and default value on one page to print.
What it draws
One command builds the complete road
Road and edges
Width both sides of the centre line, CL linetype, surface hatch and chainage.
Turning radius
Every bend filleted automatically, 10 m at the centre line by default.
Edges and median
Red and white barricades, traffic cones or kerb stone, a paved shoulder, and a median of barricades or cones. All counted for ordering.
Widening, tapers, junctions
Add an extra lane (RDW), change the width (RDT) or join a new road with kerb returns, an auxiliary lane and an island (RDJ).
Signs and markings
Signs sized by speed limit, delineator posts on curves, centre and edge lines, lane arrows and paint quantities.
Radius and sections
C1 curve data and S1 straight data labelled on the plan.
Cross sections
Layers, crossfall, shoulder, barricade, cone or kerb, and sign heights, with dimensions.
Report and Excel
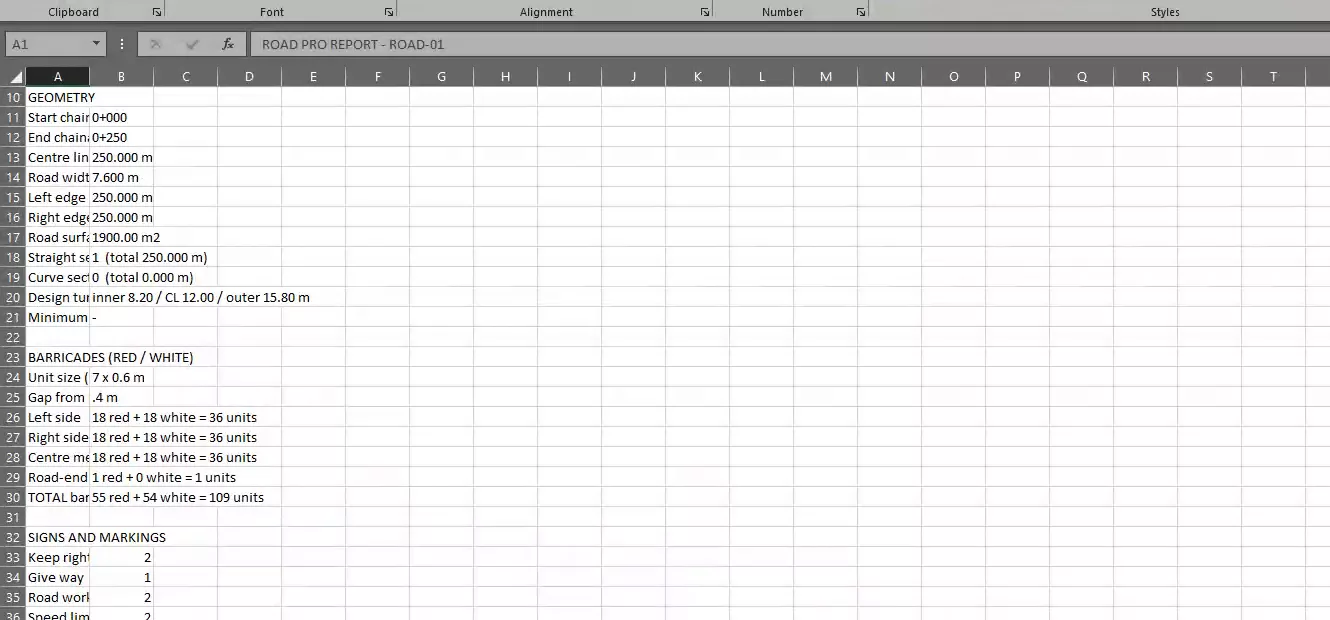
Tables in the drawing plus a CSV file for Excel, saved next to the DWG.
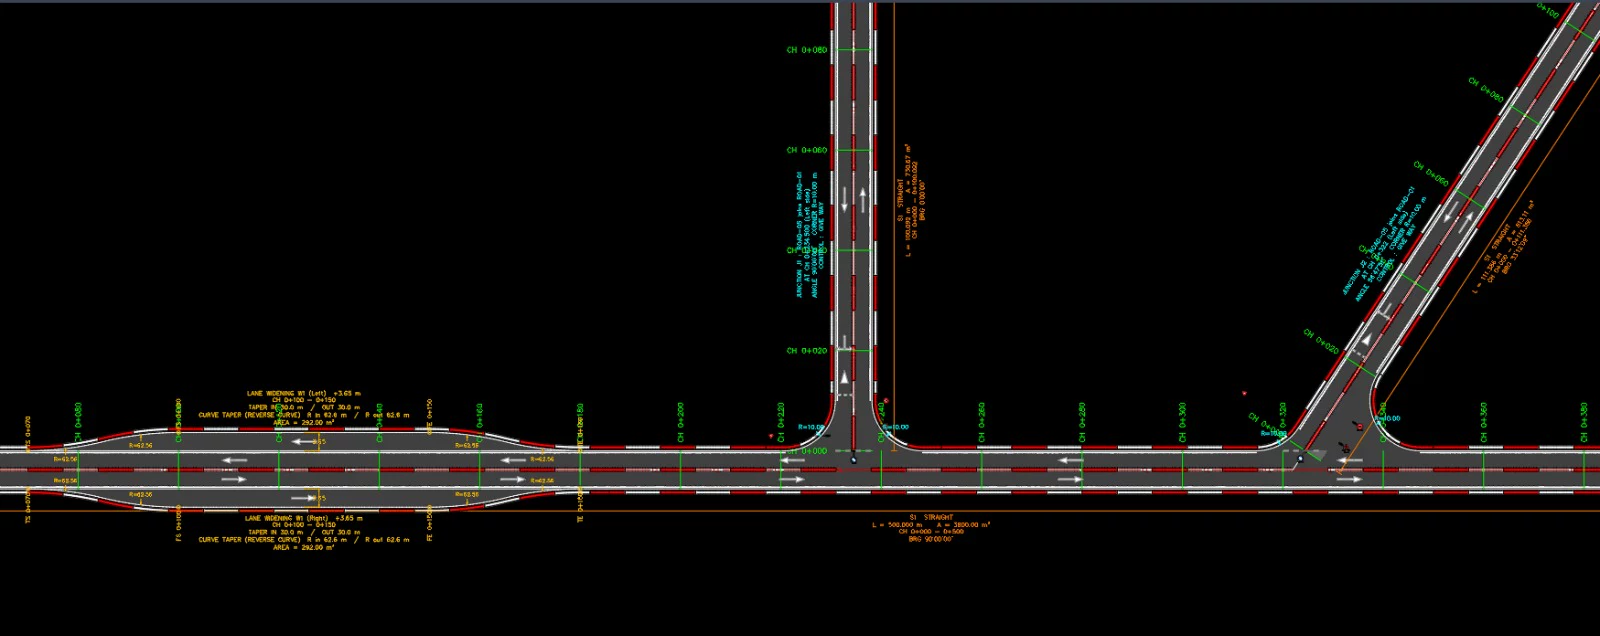
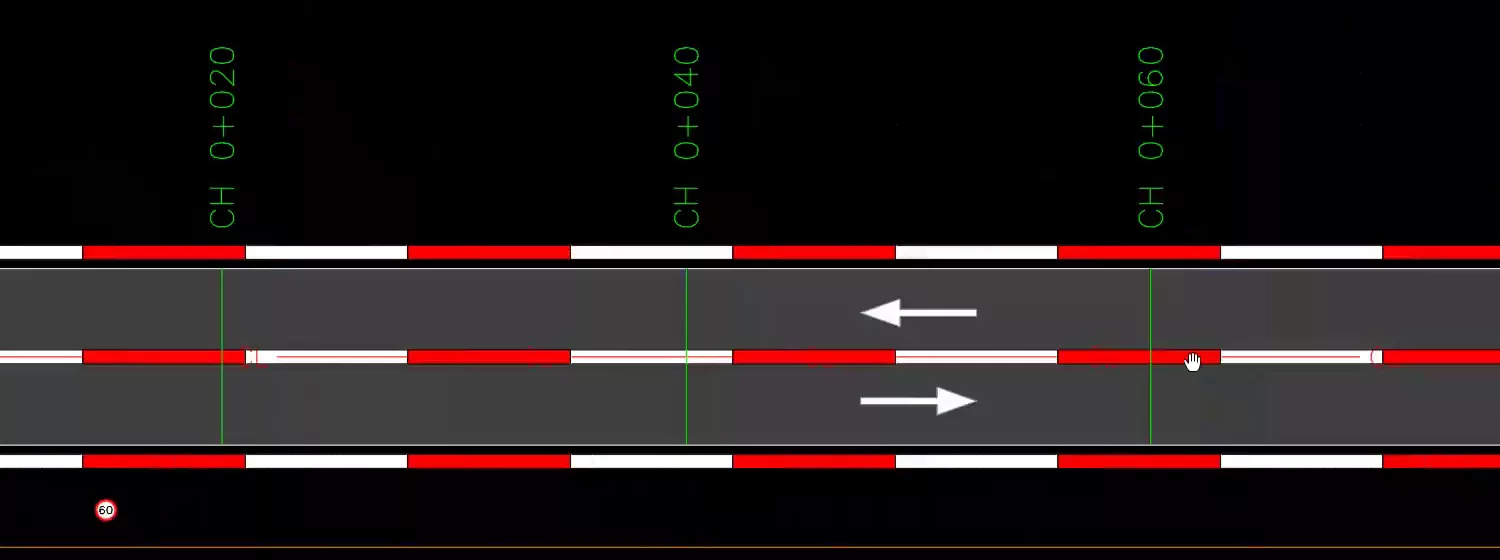
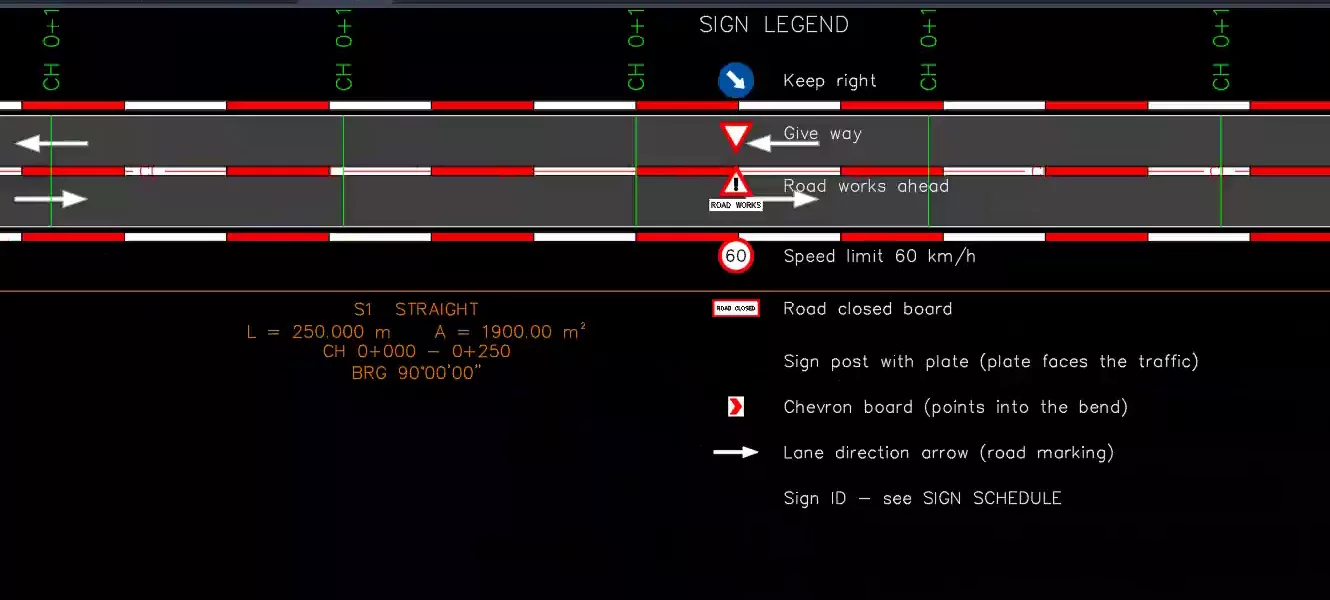
Screenshots
From the demo drawing
Install
Install and load in under a minute
Unzip RoadPro.zip, then in AutoCAD:
- 1
APPLOAD
Type APPLOAD in the AutoCAD command line.
- 2
Load
Select RoadPro.lsp and click Load.
- 3
Startup
Contents → add it to the Startup Suite so it loads in every session.
- 4
RDP
Type RDP to open the RoadPro dialog.
Workflow
From centre line to finished drawing in six steps
The whole sequence runs from one command. Steps 5 and 6 ask for a placement point; press Enter to skip the tables or the section. The Excel file is saved either way.
Step 1
Set options
RDP opens the dialog. The defaults are ready: press OK.
Step 2
Centre line
Pick points (arcs allowed, Enter to finish) or select an existing line.
Step 3
Auto build
Radius, edges, centre line, surface, barricades and chainage are drawn.
Step 4
Signs and ends
Signs with IDs, tie-in or road closed, lane arrows.
Step 5
Report
Summary on screen, Excel file saved, place the tables.
Step 6
Cross section
Pick a point to place the typical section.
Commands
All commands and shortcuts
Every command except RDP starts by asking you to select the road's centre line (layer ROAD-CL). Chainage boxes accept 100 or 0+100.
| Shortcut | Full command | What it does |
|---|---|---|
| RDP | ROADPRO | Build a complete road from a centre line (the main command) |
| RDR | ROADREPORT | Report tables and an Excel file for any RoadPro road |
| RDRAD | ROADRADIUS | Add radius, TC / CT and curve data (C1, C2 …) to the plan |
| RDSEC | ROADSECTIONS | Add straight section labels (S1, S2 …) with length, area and bearing |
| RDX | ROADXSEC | Cross sections: typical, at one chainage, or every interval |
| RDW | ROADWIDEN | Lane widening: an extra lane between two chainages that comes back, with straight or curve tapers. Each side can have its own chainages and radius |
| RDT | ROADTAPER | Road taper: wider (+) or narrower (−) between two chainages; the new width continues to the road end. Each side can have its own chainages and radius |
| RDJ | ROADJUNCTION | Junction / tie-in: join a new road with kerb-return radius, opened edge, corner surface, barricades, STOP / GIVE WAY and turning-area markings. Optional auxiliary lane (long approach taper, storage, short departure taper) and a kerbed or painted splitter island |
| RDM | ROADMARK | Road markings: yellow L4 edge lines, white L1 lane / centre line with its pattern set by speed, L2 / L2A at bends, gaps at junctions, broken L5 beside auxiliary lanes. Draw again to refresh, or remove |
| — | ROADPRORESET | Restore all settings to the defaults (no shortcut on purpose, so you can't reset by accident) |
Useful AutoCAD keys while using RoadPro
- UUndo the whole road in one step
- F2Command history: the summary and the Excel file path
- EnterFinish the centre line, or skip a prompt such as placing tables
- EscCancel the command
Widening vs taper: RDW adds an extra lane that comes back (W1, W2 …); RDT changes the width from one chainage onwards. Keep them on different chainage ranges of the same side. Junctions: run RDJ again for more branches (J1, J2 …) on either side; for a crossroads add one branch on each side at the same chainage.
Settings
Ready-made defaults
Press OK in the dialog to use them, or change any value. ROADPRORESET brings them all back.
- Road width
- 7.30 m
- Turning radius
- Match existing, or manual (10 m at the centre line)
- Edge / centre
- Barricades / centre lines
- Paved shoulder
- 0.50 m
- Barricade unit
- 2.0 × 0.5 m, 0.5 m from the edge
- Chainage
- every 20 m
- Speed limit
- 30 km/h
- Sign sizes
- By speed (Oman HDS 2017)
- Crossfall
- 2.5%
- Widening / taper
- 3.65 m / 30 m
- Auxiliary lane
- 3.65 m, tapers 60 m / 30 m, storage 30 m
- Pavement layers
- 50 / 200 / 150 mm
Layers
Everything on its own layer
Easy to freeze, colour or plot separately.
- ROAD-CL
- Centre line, CL linetype
- ROAD-EDGE
- Left and right edges
- ROAD-SURFACE
- Surface hatch
- ROAD-BARRIER-RED / WHITE / OUTLINE
- Barricade fills and black outline
- ROAD-CHAINAGE
- Ticks and labels
- ROAD-CURVE
- Radius, TC / CT, C1
- ROAD-SECTION
- Straights S1, S2
- ROAD-SIGN*
- Posts, plates, symbols
- ROAD-MARKING*
- Lane arrows
- ROAD-TIEIN
- Tie-in line and E / N
- ROAD-REPORT
- Tables and legend
- ROAD-XSEC*
- Cross section parts
- ROAD-WIDENING
- Widening and taper labels
- ROAD-JUNCTION
- Junction labels, corner R
Report
Report tables and an Excel file
Placed in the drawing and saved as a CSV next to the DWG (e.g. ROAD-01_RoadPro_Report.csv). Run RDR any time to make it again.
- Summary: general, geometry, barricades, signs, road ends, chainage
- Curve data: TC / CT chainage, radius, arc, deflection, E / N
- Road sections: every straight and curve with length, edges and area
- Setting-out: E / N of the centre line and both edges at every chainage
- Sign schedule: ID, sign, chainage, side, facing and post E / N
- Widening, taper and junction setting-out: new edge offset, kerb returns TC / IP / CT with E / N
- Quantities: barricades, cones or kerb length, and the paved shoulder area
- Road markings: edge and lane line lengths and paint area in m²
Help
Quick fixes for common questions
Unknown command RDP
Load RoadPro.lsp with APPLOAD. It needs full AutoCAD, not LT.
The road is 1000 times too small or too big
Choose Millimeters under Drawing units for millimetre drawings.
Turning radius is too small
At the centre line, the radius must be more than half the road width.
The black outline isn't visible
That's the dark screen background. It still plots black.
The Excel file couldn't be saved
Close the old CSV in Excel, then run RDR again.
Dimension text is the wrong size
Set the dimension style's text height to 0.
The junction isn't formed
Start the branch on the main road's centre line, away from widened or tapered edges.
The widening runs outside the road
Start must be at least the taper-in length, and End + taper out must stay within the road.
A chainage isn't accepted
Type 100 or 0+100. Versions before 3.0 take plain metres only.
The island lanes are too narrow
RoadPro warns when a lane beside the island is under 2.75 m. Make the island narrower or the branch road wider.
Where is the Excel file?
Next to the DWG, named like ROAD-01_RoadPro_Report.csv. Press F2 to see the full path.
Download
Get RoadPro 3.2
Free. Sign in or create a free account, then the download starts.
RoadPro plugin
RoadPro.lsp and install notes in a zip, 55 KB
User guide
Every command, setting, layer and sign, with pictures. PDF, 22 pages, 405 KB; also as PowerPoint.
Questions or a feature request? Write to us.